Hello Fabduino

Fabduino in Action - Running Servo
Non-Fab Inventory Parts
This tutorial requires two non-fab inventory parts:
- One 8Mhz resonator. Digikey part number 535-10004-1-ND.
- One ATmega 168 or ATmega 328p
- Note: there are ATmega 328's in the inventory, but I ran into issues last year with using the Arduino IDE and the 328's, but no issues with the ATMega 328p. The "p" makes a difference.
- The ATmega 168 chips also work.
Download and Mill the Files
Neil's Fabduino

Neil's Arduino board files - not all pins are pulled out. This version requires less soldering, but does not pull out all available pins on the Arduino.
- The files you want are under the "IDE" heading next to hello.arduino.168.
- You want the TRACES and INTERIOR files.
You can use either an ATmega168 or ATmega328 this board. Just make sure you burn the appropiate bootloader (more on this bleow).
Anna's Fabduino - All Pins Pulled Out

This version has all the pins pulled off of the chip. Download the zip with the traces and interior and the labeled pinouts. Use this one if your final project needs more pins. Zip file updated 3/27/2013 with new board and labeled pinout diagram.
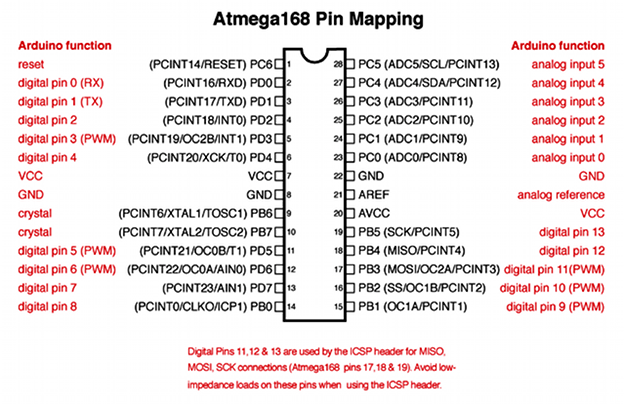
Arduino Pinouts vs ATmega168 / ATmega328 Pinouts
Note that the pinouts on the microcontroller are not the same numbers in the Arduino code. The microcontroller pin number is listed on the microcontroller body below. The corresponding Arduino pin is listed on the outside - to the right or left.
Here is a link to the Arduino Pin Mapping diagram for the ATmega168 / ATmega328, I have also included the diagram below.
Materials and Tools
You need an in-system programmer (ISP) use the FabISP we made in class.

Download the Arduino IDE Software
You'll need the Arduino software, version 1.0. You can download Arduino 1.0 from the Arduino site. Installation instructions are available for Windows and for Mac OS X.
Make Sure You Have the FTDI Drivers Installed
Get the drivers for your OS here: http://www.ftdichip.com/Drivers/VCP.htm
How to Burn the Bootloader to Your Fabduino:
Burn the bootloader for your version - this tutorial assumes you are using a ATmega 328 with a 8 Mhz external clock and the FabISP programmer. If you are using Ubuntu - see this page for how to run avrdude as sudo from Ubuntu.
Step 1. Power the Fabduino Board and your Programmer
- Make sure that your ISP is plugged in and is connected to the 6-pin programming header on your Fabduino.
- Plug your Arduino board into a FTDI cable to power it.

Step 2: Check your Serial Port
Select the serial port that represents your Arduino board. If you are unsure of this, look at the ports with the Arduino unplugged. Then plug it in with the FTDI cable. The port that appears is the correct one.

Step 3: Select a Board
Select your board type: Tools > Board > Arduino Pro or Pro Mini (3.3V, 8 MHz) w ATmega328
If you are using an ATmega168 - make sure to select the Arduino Pro or Pro Mini (3.3V, 8 MHz) w ATmega168 option.
NOTE: This code example works if you are using an external 8MHZ resonator.
It is possible to use the Arduino IDE to burn the bootloader to a fabbed Arduino board that does not have an external clock. See Ed Baffi's Fabkit / Fabduino page for how to program an fabbed Arduino without an external clock through the Arduino IDE.

Step 4: Select a Programmer
Select your programmer: Tools > Programmer menu > USBtinyISP

Step 5: Burn the Bootloader
To burn the Bootloader go to: Tools > Burn Bootloader

Near the bottom of the IDE window, this message would be displayed.

If you are sucessful, you will see this message.

Now you should have a working Arduino board. Enjoy.
Test your Board
To test your board, run the blink sketch. Located in File > Examples > Basics > Blink


The LED on your board should now be blinking. Success!
To Burn the Bootloader with Avrdude (instead of using the Arduino IDE):
If you are having issues burning the bootloader with the Arduino IDE or would rather use avrdude directly - here is how to do it.
NOTE: This code example works if you are using an external 8MHZ resonator.
Download the Arduino Bootloader File for the Atmega168:
Right click to save the filesSet the fuses with:
Paste code is all in one line
avrdude -c usbtiny -p m168 -B 5 -u -U lock:w:0x0F:m -U  efuse:w:0x00:m -U
hfuse:w:0xdd:m -U lfuse:w:0xf6:m -P usb
Burn the bootloader with:
Paste code is all in one line
avrdude -P usb -c usbtiny -p m168  -u -U flash:w:ATmegaBOOT_168_pro_8MHz.hex
-U lock:w:0x0F:m -B .2
The options used:
- -u --> Disable safemode, default when running from a script.
- -U
:r|w|v: [:format] --> Memory operation specification. Multiple -U options are allowed, each request is performed in the order specified.
