11 Input Device Examples
Contents: ATtiny 45/85 Pinouts
Mac Users - Get PySerial
Hello Microphone
Hello Light (Phototransistor)
ATtiny 45 / 85 Pinouts

If using a Mac - you need PySerial:
http://sourceforge.net/projects/pyserial/files/latest/download
To install, open terminal and move to the directory.
Type:
sudo python setup.py install
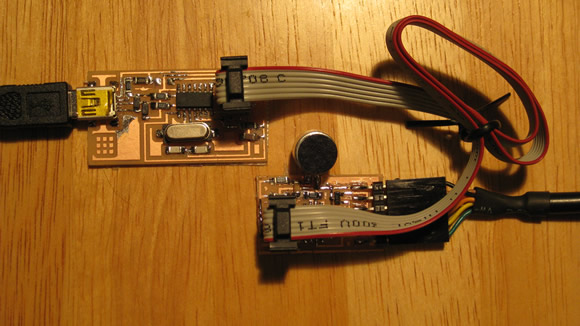
Hello Microphone Board
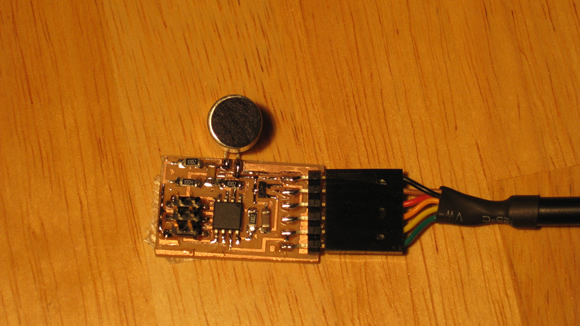
Programming Hello Microphone with the FabISP
Download the Files:
To program your Hello Microphone - download all the files - you need the c and makefile. Look at the back of the microphone - the negitive end is has marks that extend to the back of the case.
If Using ATtiny85 Instead
Note: If you are using a microcontroller with the same pin configuration but different memory (for example the ATtiny85 instead of the ATtiny45- you will need to edit the makefile.
To edit the makefile for the ATtiny85, open terminal and move to the directory where you downloaded the c code and makefile.
Type:
nano hello.mic.45.make
The program will open in the nano text editor (it looks like the code below)
Change each line with a "45" to "85". Except the line that says PROJECT=hello.mic.45. Leave that line.
PROJECT=hello.mic.45
SOURCES=$(PROJECT).c
MMCU=attiny85
F_CPU = 8000000

CFLAGS=-mmcu=$(MMCU) -Wall -Os -DF_CPU=$(F_CPU)

$(PROJECT).hex: $(PROJECT).out
        avr-objcopy -O ihex $(PROJECT).out $(PROJECT).c.hex;\
   avr-size --mcu=$(MMCU) --format=avr $(PROJECT).out

$(PROJECT).out: $(SOURCES)
        avr-gcc $(CFLAGS) -I./ -o $(PROJECT).out $(SOURCES)

program-bsd: $(PROJECT).hex
        avrdude -p t85 -c bsd -U flash:w:$(PROJECT).c.hex

program-dasa: $(PROJECT).hex
        avrdude -p t85 -P /dev/ttyUSB0 -c dasa -U flash:w:$(PROJECT).c.hex

program-avrisp2: $(PROJECT).hex
        avrdude -p t85 -P usb -c avrisp2 -U flash:w:$(PROJECT).c.hex

program-usbtiny: $(PROJECT).hex
        avrdude -p t85 -P usb -c usbtiny -U flash:w:$(PROJECT).c.hex

program-dragon: $(PROJECT).hex
        avrdude -p t85 -P usb -c dragon_isp -U flash:w:$(PROJECT).c.hex
To save the file:
- press [control]+O to save the file
- press [control]+X to exit the editor
To Flash the Microntroller:
sudo make -f hello.mic.45.make program-usbtiny
If Working - This is the Terminal Output Produced (for ATtiny45)
avr-objcopy -j .text -O ihex hello.mic.45.out hello.mic.45.c.hex;\
avr-size --mcu=attiny45 --format=avr hello.mic.45.out
AVR Memory Usage
----------------
Device: attiny45

Program:     500 bytes (12.2% Full)
(.text + .data + .bootloader)

Data:        200 bytes (78.1% Full)
(.data + .bss + .noinit)


avrdude -p t45 -P usb -c usbtiny -U flash:w:hello.mic.45.c.hex

avrdude: AVR device initialized and ready to accept instructions

Reading | ################################################## | 100% 0.00s

avrdude: Device signature = 0x1e9206
avrdude: NOTE: FLASH memory has been specified, an erase cycle will be performed
To disable this feature, specify the -D option.
avrdude: erasing chip
avrdude: reading input file "hello.mic.45.c.hex"
avrdude: input file hello.mic.45.c.hex auto detected as Intel Hex
avrdude: writing flash (500 bytes):

Writing | ################################################## | 100% 0.87s


avrdude: 500 bytes of flash written
avrdude: verifying flash memory against hello.mic.45.c.hex:
avrdude: load data flash data from input file hello.mic.45.c.hex:
avrdude: input file hello.mic.45.c.hex auto detected as Intel Hex
avrdude: input file hello.mic.45.c.hex contains 500 bytes
avrdude: reading on-chip flash data:

Reading | ################################################## | 100% 1.00s


avrdude: verifying ...
avrdude: 500 bytes of flash verified

avrdude: safemode: Fuses OK

avrdude done.  Thank you.
Run The Python Program (Ubuntu)
python hello.mic.45.py /dev/ttyUSB0
Run The Python Program (Mac)
Your serial port may be different depending on your computer. You need to find the port for your comupter. To find your serial port, with the board attached:, in terminal - type
ls /dev/tty.usb*
Then use the port you are given to run the python program. For example - when I type "ls /dev/tty.usb*", I get "/dev/tty.usbserial-FTF53NJC". So I would type:
hello.mic.45.py /dev/tty.usbserial-FTF53NJC
Visualized Microphone Output - Dead Kennedys "Man With The Dogs"
Visualized Microphone Output - Dan Deacon "Ohio"
Visualized Microphone Output - Chromeo "She's In Control"
Hello Phototransistor
The purpose of this board is to take input from a phototransistor and display it visually using a python program when the board is connected to a computer via a FTDI cable. Link to the Fab Academy board diagrams / pngs and code. You need the c and the makefile.
Note: The collector side of the phototransistor is usualy marked in some way. Check the datasheet for the part you are using.
If Using ATtiny85 Instead
Note: If you are using a microcontroller with the same pin configuration but different memory (for example the ATtiny85 instead of the ATtiny45- you will need to edit the makefile.
To edit the makefile for the ATtiny85, open terminal and move to the directory where you downloaded the c code and makefile.
Type:
nano hello.light.45.make
The program will open in the nano text editor (it looks like the code below)
Change each line with a "45" to "85". Except for the line that says PROJECT=hello.mic.45.
PROJECT=hello.light.45
SOURCES=$(PROJECT).c
MMCU=attiny85
F_CPU = 8000000

CFLAGS=-mmcu=$(MMCU) -Wall -Os -DF_CPU=$(F_CPU)

$(PROJECT).hex: $(PROJECT).out
        avr-objcopy -O ihex $(PROJECT).out $(PROJECT).c.hex;\
   avr-size --mcu=$(MMCU) --format=avr $(PROJECT).out

$(PROJECT).out: $(SOURCES)
        avr-gcc $(CFLAGS) -I./ -o $(PROJECT).out $(SOURCES)

program-bsd: $(PROJECT).hex
        avrdude -p t85 -c bsd -U flash:w:$(PROJECT).c.hex

program-dasa: $(PROJECT).hex
        avrdude -p t85 -P /dev/ttyUSB0 -c dasa -U flash:w:$(PROJECT).c.hex

program-avrisp2: $(PROJECT).hex
        avrdude -p t85 -P usb -c avrisp2 -U flash:w:$(PROJECT).c.hex

program-usbtiny: $(PROJECT).hex
        avrdude -p t85 -P usb -c usbtiny -U flash:w:$(PROJECT).c.hex

program-dragon: $(PROJECT).hex
        avrdude -p t85 -P usb -c dragon_isp -U flash:w:$(PROJECT).c.hex
To save the file:
- press [control]+O to save the file
- press [control]+X to exit the editor
To Flash the Board
sudo make -f hello.light.45.make program-usbtiny
Terminal Output When Board is Being Flashed
[sudo] password for akaziuna:
avr-gcc -mmcu=attiny45 -Wall -Os -DF_CPU=8000000 -I./
-o hello.light.45.out hello.light.45.c
avr-objcopy -j .text -O ihex hello.light.45.out hello.light.45.c.hex;\
avr-size --mcu=attiny45 --format=avr hello.light.45.out
AVR Memory Usage
----------------
Device: attiny45

Program:     426 bytes (10.4% Full)
(.text + .data + .bootloader)

Data:          0 bytes (0.0% Full)
(.data + .bss + .noinit)


avrdude -p t45 -P usb -c usbtiny -U flash:w:hello.light.45.c.hex

avrdude: AVR device initialized and ready to accept instructions

Reading | ################################################## | 100% 0.01s

avrdude: Device signature = 0x1e9206
avrdude: NOTE: FLASH memory has been specified, an erase cycle will be performed
         To disable this feature, specify the -D option.
avrdude: erasing chip
avrdude: reading input file "hello.light.45.c.hex"
avrdude: input file hello.light.45.c.hex auto detected as Intel Hex
avrdude: writing flash (426 bytes):

Writing | ################################################## | 100% 1.27s


avrdude: 426 bytes of flash written
avrdude: verifying flash memory against hello.light.45.c.hex:
avrdude: load data flash data from input file hello.light.45.c.hex:
avrdude: input file hello.light.45.c.hex auto detected as Intel Hex
avrdude: input file hello.light.45.c.hex contains 426 bytes
avrdude: reading on-chip flash data:

Reading | ################################################## | 100% 0.77s


avrdude: verifying ...
avrdude: 426 bytes of flash verified

avrdude: safemode: Fuses OK

avrdude done.  Thank you.
Run The Visualization Program (Ubuntu)
python hello.light.45.py /dev/ttyUSB0
Run The Python Program (Mac)
Your serial port may be different depending on your computer. You need to find the port for your comupter. To find your serial port, with the board attached:, in terminal - type
ls /dev/tty.usb*
Then use the port you are given to run the python program. For example - when I type "ls /dev/tty.usb*", I get "/dev/tty.usbserial-FTF53NJC". So I would type:
python hello.light.45.py /dev/tty.usbserial-FTF53NJC