Input Device Examples - in C
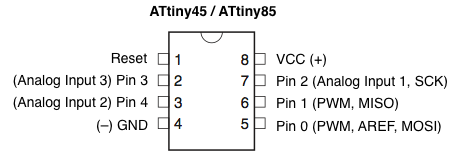
Contents: ATtiny 45/85 Pinouts
Ubuntu Users - Install Tkinter
Mac Users - Install PySerial
Windows Users - Install Python, PySerial, Tkinter
Hello Microphone
Hello Light (Phototransistor)
The boards listed here are just examples, you can program and run the Python visualization programs for all the input hello worlds in the same way.
ATtiny 45 / 85 Pinouts
If using Ubuntu
You need Tkinter:
Type:
sudo apt-get install python-tk
If using a Mac
You need PySerial:
To install, open terminal and move to the directory.
Type:
sudo python setup.py install
If using Windows
Pay attention to the version of Windows you are using!
I tested these instructions using Windows 7, 64 bit. Windows 8 is uncharted.
If you are unsure, you can find out by:
- going to the "Start" menu
- right click on "computer"
- select "properties"
- The properties menu will tell you the version (64 or 32 bit).
I had to jump through many hoops for the 64 bit version. I have outlined the process here. I have not tested on the 32 bit version of Windows.
You need Python (use 2.7.3 - it works with the dependencies listed)
- Python Download page (all downloads)
- If running 64 bit windows - use: Windows X86-64 MSI Installer (2.7.3)
- If running 32 bit windows - use: Windows x86 MSI Installer (2.7.3)
Add Python to your Path
- Go to the "Start" menu
- Right click on "Computer"
- Select "properties" from the menu
- Click "Advanced System Settings"
- Select "Environmental Variables"
- Under "variables" select "Path" so it is highlighted in blue
- Select the "Edit" button.
- This text (or something like it) will already be in the box.: C:\Tcl\bin;%PATH%
- Just add to whatever you have already.....
- Add a semicolon directly after the text (NO SPACES).
- Then add the following: C:\Python27
The final result should look like this (on 64 bit Windows anyway):
C:\Tcl\bin;%PATH%;C:\Python27
Restart your computer
If you did everything correctly, after you restart, you can open the Windows command line and type "python". You should get a python version number.
If you get an error, you can run python by navigating to the folder as described here: http://web.media.mit.edu/~liningy/sub_work/lining.yao/design%20about/Tutorial_2.html
You need PySerial
- About PySerial
- For 64 bit windows - important!
- Must use alternate packages or Pyserial won't install on 64 bit OS.
- Dowload pyserial-2.6.win-amd64-py2.7.exe
- For 32 bit windows
You need Tkinter
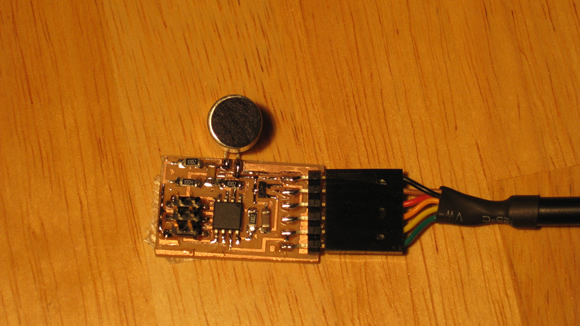
Hello Microphone Board
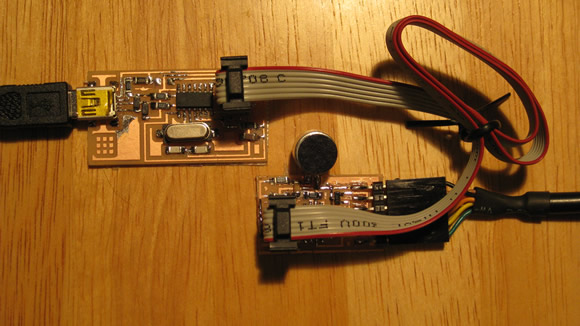
Programming Hello Microphone with the FabISP
Download the Files:
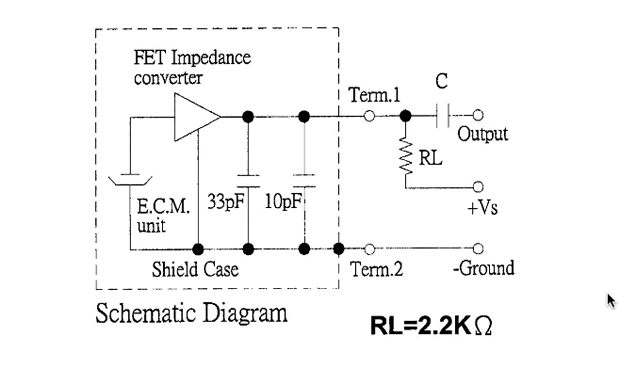
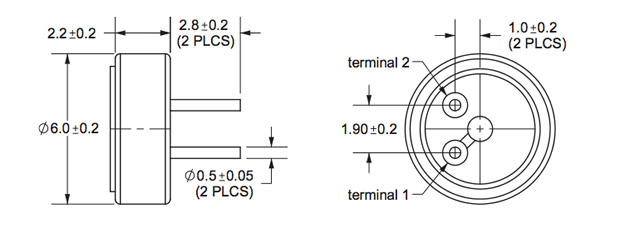
To program your Hello Microphone - download all the files - you need the C and makefile. Look at the back of the microphone - the positive end is has marks that extend to the back of the case (terminal 1).
To Flash the Microntroller:
sudo make -f hello.mic.45.make program-usbtiny
If Working - This is the Terminal Output Produced
avr-objcopy -j .text -O ihex hello.mic.45.out hello.mic.45.c.hex;\
avr-size --mcu=attiny45 --format=avr hello.mic.45.out
AVR Memory Usage
----------------
Device: attiny45

Program:     500 bytes (12.2% Full)
(.text + .data + .bootloader)

Data:        200 bytes (78.1% Full)
(.data + .bss + .noinit)


avrdude -p t45 -P usb -c usbtiny -U flash:w:hello.mic.45.c.hex

avrdude: AVR device initialized and ready to accept instructions

Reading | ################################################## | 100% 0.00s

avrdude: Device signature = 0x1e9206
avrdude: NOTE: FLASH memory has been specified, an erase cycle will be performed
To disable this feature, specify the -D option.
avrdude: erasing chip
avrdude: reading input file "hello.mic.45.c.hex"
avrdude: input file hello.mic.45.c.hex auto detected as Intel Hex
avrdude: writing flash (500 bytes):

Writing | ################################################## | 100% 0.87s


avrdude: 500 bytes of flash written
avrdude: verifying flash memory against hello.mic.45.c.hex:
avrdude: load data flash data from input file hello.mic.45.c.hex:
avrdude: input file hello.mic.45.c.hex auto detected as Intel Hex
avrdude: input file hello.mic.45.c.hex contains 500 bytes
avrdude: reading on-chip flash data:

Reading | ################################################## | 100% 1.00s


avrdude: verifying ...
avrdude: 500 bytes of flash verified

avrdude: safemode: Fuses OK

avrdude done.  Thank you.
Run The Python Program (Ubuntu)
python hello.mic.45.py /dev/ttyUSB0
Run The Python Program (Mac)
Your serial port may be different depending on your computer. You need to find the port for your computer. To find your serial port, with the board attached:, in terminal - type
ls /dev/tty.usb*
Then use the port you are given to run the python program. For example - when I type "ls /dev/tty.usb*", I get "/dev/tty.usbserial-FTF53NJC". So I would type:
python hello.mic.45.py /dev/tty.usbserial-FTF53NJC
Run The Python Program (Windows)
Connect your board with the FTDI cable. Check to see what port you are connected to:
From the Device Manager:
- Start Menu > Devices and Printers
- Click on "Unspecified" TTL232R-3V3
- Click on the "Hardware" tab
- Under "USB Serial Port" there will be a number (probably COM6 or COM5)
- Use whatever port number is listed in the code below.....
- Open the Windows command line
python hello.mic.45.py COM6
Visualized Microphone Output - Dead Kennedys "Man With The Dogs"
Visualized Microphone Output - Dan Deacon "Ohio"
Visualized Microphone Output - Chromeo "She's In Control"
Hello Phototransistor
The purpose of this board is to take input from a phototransistor and display it visually using a python program when the board is connected to a computer via a FTDI cable.
Link to the Fab Academy board diagrams / pngs and code. You need the c and the makefile.
Note: The collector side of the phototransistor is usualy marked in some way. Check the datasheet for the part you are using.
To Flash the Board
sudo make -f hello.light.45.make program-usbtiny
Terminal Output When Board is Being Flashed
[sudo] password for akaziuna:
avr-gcc -mmcu=attiny45 -Wall -Os -DF_CPU=8000000 -I./
-o hello.light.45.out hello.light.45.c
avr-objcopy -j .text -O ihex hello.light.45.out hello.light.45.c.hex;\
avr-size --mcu=attiny45 --format=avr hello.light.45.out
AVR Memory Usage
----------------
Device: attiny45

Program:     426 bytes (10.4% Full)
(.text + .data + .bootloader)

Data:          0 bytes (0.0% Full)
(.data + .bss + .noinit)


avrdude -p t45 -P usb -c usbtiny -U flash:w:hello.light.45.c.hex

avrdude: AVR device initialized and ready to accept instructions

Reading | ################################################## | 100% 0.01s

avrdude: Device signature = 0x1e9206
avrdude: NOTE: FLASH memory has been specified, an erase cycle will be performed
         To disable this feature, specify the -D option.
avrdude: erasing chip
avrdude: reading input file "hello.light.45.c.hex"
avrdude: input file hello.light.45.c.hex auto detected as Intel Hex
avrdude: writing flash (426 bytes):

Writing | ################################################## | 100% 1.27s


avrdude: 426 bytes of flash written
avrdude: verifying flash memory against hello.light.45.c.hex:
avrdude: load data flash data from input file hello.light.45.c.hex:
avrdude: input file hello.light.45.c.hex auto detected as Intel Hex
avrdude: input file hello.light.45.c.hex contains 426 bytes
avrdude: reading on-chip flash data:

Reading | ################################################## | 100% 0.77s


avrdude: verifying ...
avrdude: 426 bytes of flash verified

avrdude: safemode: Fuses OK

avrdude done.  Thank you.
Run The Visualization Program (Ubuntu)
python hello.light.45.py /dev/ttyUSB0
Run The Python Program (Mac)
Your serial port may be different depending on your computer. You need to find the port for your computer. To find your serial port, with the board attached:, in terminal - type
ls /dev/tty.usb*
Then use the port you are given to run the python program. For example - when I type "ls /dev/tty.usb*", I get "/dev/tty.usbserial-FTF53NJC". So I would type:
python hello.light.45.py /dev/tty.usbserial-FTF53NJC
Run The Python Program (Windows)
Connect your board with the FTDI cable. Check to see what port you are connected to:
From the Device Manager:
- Start Menu > Devices and Printers
- Click on "Unspecified" TTL232R-3V3
- Click on the "Hardware" tab
- Under "USB Serial Port" there will be a number (probably COM6 or COM5)
- Use whatever port number is listed in the code below.....
- Open the Windows command line
python hello.light.45.py COM6
